Tuesday, February 8, 2011

Super Bowl recipe roundup

I have been quiet lately but busy. This past weekend was the superbowl, in case you lived under a rock, and of course western PA was decked out in black and gold OR black and yellow if you are a fan of this song
Due to the mess of our house, we are rearranging my studio and the hubby's office, we went over to the inlaws for the game and I offered to make some dips and of course dessert. In an epic fail, I have NO PICS UGH.
The two dips I made were from Brown Eyed Baker. she posted about a dip party she went to and shared some of the recipes. I LOVE the idea of a dip party. I am a huge appetizer fan, I like small portions of all different types of food.

Reuben Dip
This is my new favorite dip, displacing buffalo chicken dip from the #1 spot. I started weight watchers last week so I did substitute low fat ingredients when possible.

Yield: 6 to 8 servings

Prep Time: 15 minutes | Bake Time: 15 to 20 minutes

8 ounces cream cheese, softened
1½ cups (6 ounces) shredded Swiss cheese
4 ounces deli sliced corned beef, chopped
½ cup Thousand Island dressing
½ cup drained sauerkraut

1. Preheat oven to 400 degrees F.

2. In a large bowl mix together the cream cheese, 1 cup of the Swiss cheese, the dressing and corned beef. Spread in a pie plate or other shallow serving dish. Top with the sauerkraut and the remaining ½ cup of Swiss cheese.

3. Bake for about 15 minutes, or until bubbly around the edges. Serve hot with pretzel crisps or cocktail-size rye bread squares.

Sausage Dip

I've made this before but I call it fiesta dip and also add velvetta cheese. I also baked it for 15 mins as opposed to microwaving it.

Yield: About 8 to 10 servings

Prep Time: 15 minutes

2 16-oz. rolls of regular sausage (Bob Evans, Jimmy Dean, whatever your favorite brand is)
2 8-oz. packages of cream cheese, softened
28 ounces picante sauce

1. Brown the sausage, breaking it up and crumbling it as it cooks. Once cooked through, remove from skillet with a slotted spoon and place in serving bowl. Mix in the cream cheese and picante sauce.

2. Microwave in 30 seconds increments, stirring between each, until the dip is heated through and the cream cheese is melted.

3. Serve with your favorite tortilla chips, pretzel crisps or crackers.

now on to dessert!

Since the steelers were in the game, I had to make something black and gold so I went to a tried and true recipe-BOSTON CREAM CUPCAKES Nomnomnom

These are SO easy.

1 pack vanilla pudding mix

Chocolate chips

Heavy cream

1 box yellow cake mix

plus all the items needed to make the cake and pudding.

Prepare cake mix according to directions. Decide if you are doing cupcakes or a whole cake.

Prepare pudding according to directions for pie filling.

Instructions for cupcakes-

Prepare cakes and let cool. Once pudding is done setting, carefully cut off cupcake tops. Spoon vanilla pudding onto the cupcake and replaced cupcake top. You want to make sure you keep the vanilla pudding in the middle when you are spooning it on, so it doesnt run down the sides.

Repeat for all cupcakes.

Microwave chocolate for 2 mins. You will want to stir it after 1 minute and then keep a close eye on it.

Once chocolate is melted, whip in the heavy cream until it is creamy.

Drizzle chocolate mix over cupcakes or use like frosting.

Whole cake instructions-

Make 2 round cakes. Once they are cooled, spoon vanilla pudding on the bottom layer and then place top layer on top. Once again, keep the pudding away from the edges so it doesnt run down the sides.

Coat the top of the cake in the chocolate sauce and then drizzle it around the sides.

Enjoy!

Very easy dessert that is sure to impress.

Tuesday, February 1, 2011

Easy DIY flower


Have you seen those pretty silk flowers that have popped up on shirts, jackets, pins, or hairclips? Well they are SUPER SUPER easy to make.


What you need-material of your choice, not cotton!I am using chiffon but you can use cheaper silk or tulle.
Scissors
Hot glue gun
New candle
Beads
thread and needle
hair clip, bobby pin, or pin back
Felt

First step is to cut your flowers. I like FULL flowers so I usually do 6-7 layers of varying sizes. I cut the material in squares and then fold them in half to make them easier to cut.
You want to cut out several sizes, including small and large just like real flower petals
Now you get to play with fire. I use new(er) candles for this so the flame is higher. You cant use a lighter because you need both hands. You are going to use the candle flame to shape the petals and make them curl up. You will also get that singed appearance around the edges. Now you do this by placing the material NEAR the flame, not directly on it. The heat will make the material curl up, you can also help it by shaping it with your fingers. This step may take some practice but it is not hard to master at all.

Now repeat with all the layers you cut and stack them.
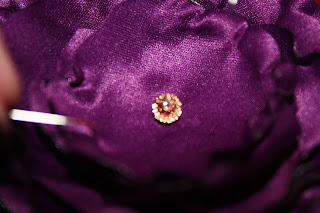
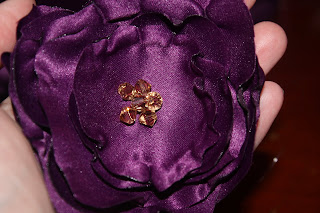
You will stitch the stake together and add some beads. You can also use pretty buttons or stones. For beads and buttons I like to stitch them as opposed to hot gluing them.

Awww now isnt that pretty?!?
Now to attach it to a bobby pin. You will place a square of felt on the back your flower.
Now attach the bobby pin. You need to use a bobby pin that has a pad on it. You can find them at Joanns, hobby lobby, etc. Once you have the attached the bobby pin, with hot glue, place a 2nd piece of felt over it. You want to make sure you dont interfere with the part of the pin that goes in the hair.
Want to make a pin? attach the first piece of felt and then hot glue the pin back to the felt.
Open the pin and then place a 2nd piece of felt so you secure it.

and you are done!

remember you can also use a french barrette or alligator clip. Use the same method-square of felt on the back, secure the hardware, and then a 2nd piece of felt to give extra security.

Friday, January 28, 2011

Party Party Party

My nephew is turning 1 on June 30th so my sister is already thinking of the party. I have stepped up as her personal party coordinator. As I told her, I come up with the ideas and all she has to do is say yay or nay and pay LOL
My sister mentioned that she wanted a monkey shirt so I immediately thought of this adorable shirt from my friend Loree-

and I talked to Loree, and she is going to do matching invitations YAY

So the theme is monkey and the colors are jungle colors like green,yellow.
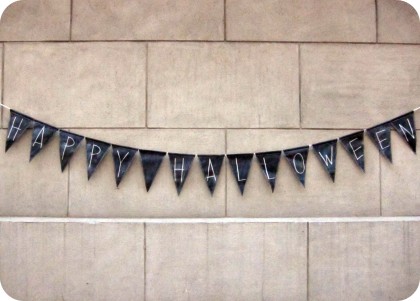
My sister wants a personalized banner so I told her I would make one for her BUT using chalkboard fabric so it can be reused.
It will be similar to this one but using either ribbon or bias tape as a border around each triangle.


My sister is also GAGA over using a monogram and this etsy shop has some of the best ones, so super cute.

I think this would be perfect-

I have convinced my sister that a candy buffet is a must. She is renting out a room, so we need to come up activities that all the kiddos can do. I think a candy buffet would not only be cute visually, but it would keep the kids busy

but now I am OBSESSED with the idea of a Smores Bar-

Just imagine all the different chocolates you could put out for guests and then even additional toppings like candy pieces, strawberries or bananas

My sister also really loves the look of this party from Hostess with the Mostess


so I am also going to come with a graphic of a banana tree that can be used for other paper goods like labels.

My sister and I have agreed to coordinate party years, meaning we will TRY not both have big birthday parties in the same year. yes we live 7 hours apart but we want to attend all the parties so since this year goes to Frankie, next year belongs to the girls. I am already excited for it since it will be their first "friend party" since they are starting preschool in fall '11.

Wednesday, January 26, 2011

Tutorial-A Valentine's day hanging banner

So I used my embroidery machine and made each of my girls a banner for valentines day. They love them and agreed that they are BOOTIFUL
On each heart there is stitching to resemble lace, so cute-


I was spelling out love
Now you need to heat seal the edges. This is when you use the lighter. Just place the lighter close to the edge of the hearts NOT DIRECTLY TOUCHING. This helps cut down the fuzziness and gives a nice clean edge to the felt.

You now have to attach all the hearts together. I am making a vertical hanging blogger so I am going to basically use the ribbon to weave it in and out of the hearts.

Cut a small slit in the top of the first heart and then the bottom. Dont make it too big because it should snuggly hold the ribbon.


At the bottomof the last heart, you will need to glue the ribbon to the heart and make a loop so you can hang the banner.

If you want to make the banner hang horizontally, then cut small slits on the sides of the hearts and use ribbon to tie them together. That is what I did in the banners I made with my embroidery machine, so use that banner as a reference.

Hang and Enjoy!
If you find that the ribbon doesnt fit snuggly and the hearts shift around, just fix that with a bit of glue.